Excel web access web part gives error message as “Access Denied”
Now suppose you wish to look at your workbook in sharepoint site you will have to take care of some things, first and the foremost is that your Excel calculation services needs to be turned on,
Then you need to make sure that the excel file you save is in xlsx format as the excel calculation services is not compatible with xls files.
Then make sure the location which can be UNC path or a sharepoint site is added to the trusted file location in SSP
Also choose Trusted children and Trusted data connection in Libraries and Embedded
Enabled user defined functionalities allowed
Then you add the Excel web Access web part to the site. Try adding the path in the configurable section, try accessing the page if you still get Access Denied Error message then maybe the culprit is your authentication provider which might be Kerberos, so you will have to run these 3 commands to make sure it is activated
stsadm -o set-ecssecurity -accessmodel delegation -ssp SharedServices1 (here escsecurity means excel calculation security)
stsadm -o setsharedwebserviceauthn -negotiate
stsadm -o execadmsvcjobs
Ran an IIS Reset
Then try accessing the webpart the workbook will render just fine.
Friday, October 24, 2008
Thursday, October 16, 2008
How to install SharePoint v2 Service Packs?
NOTE:
Before you start make sure you have all possible backups Full farm backup, SQL Database backup, stsadm -o backup etc.
Install during off production hours so the files will not be in use.
Install Service Packs in order WSS2.0 SP first SPS03 SP later.
Windows SharePoint Services 2.0 Service Pack 2 (SP2)
http://www.microsoft.com/downloads/details.aspx?FamilyId=9C552114-DC9A-43EE-9281-B080B7C280B4&displaylang=en
SharePoint Portal Server 2003 Service Pack 2
http://www.microsoft.com/downloads/details.aspx?familyid=171DC9A7-B4BA-4759-BD64-6B7D851A97EF&displaylang=en
In case you upgrade to WSS2.0 SP3 & SPS2003 SP3 also apply post sp3 hot fixes
Windows SharePoint Services Service Pack 3 (SP3)
http://www.microsoft.com/downloads/details.aspx?familyid=2BBFC89B-EB59-49FF-B58F-684693CB25A7&displaylang=en
Description of the Windows SharePoint Services 2.0 post-Service Pack 3 hotfix package: January 25, 2008
http://support.microsoft.com/kb/941412
SharePoint Portal Server 2003 Service Pack 3 (SP3)
http://www.microsoft.com/downloads/details.aspx?familyid=AB086D48-1148-48DE-B4EC-A6298367E5F0&displaylang=en
Description of the SharePoint Portal Server 2003 post-Service Pack 3 hotfix package: February 26, 2008
http://support.microsoft.com/kb/943167
In case you face any problem after installing service packs try following commands to upgrade all components & database schemas forcefully.
Open a command prompt
Browse to C:\Program Files\Common Files\Microsoft Shared\web server extensions\60\BIN Run following command:
stsadm –o upgrade –forceupgrade –url [Site URL]
Tuesday, October 14, 2008
Search service stuck at stopping or starting
>> Search service stuck at stopping or starting
Search as we know is one of the best features on MOSS, Office SharePoint has the best ability to index and search documents, file share’s, and other things as well, it stores the indexed documents in search databases and renders them whenever required. Well that’s about how it works, but what will you do if your search service is central admin is shows the status as stopping or starting,
If your search service is stuck even after you reboot the server this might be a problem,
Look at the services console first and check if Windows SharePoint Search service is running and if the Office SharePoint servers search is running as well
Then check if they are running with the right service accounts.
This problem may arise the most when you have the two different accounts configured to run WSS and MOSS
What should I do?
Now you are at a stage where your search service is stuck it’s neither started not stopped. So when nothing works in SharePoint the command line works, let’s get our hero to work. J
First of all let’s get the search service stopped first. We will stop the OSearch first and then the WSS search.
To stop the search server you will have to use the command line operation here is the command
Stsadm –o osearch –action stop
Run iisreset / noforce
Similarly you will have to stop the wss search service
Stsadm –o spsearch –action stop
This will force stop the services, then we will un-provision the services before we actually start them, now if you are wondering what is provision service command used for it actually Starts or stops the SPService on the local computer or a custom service. To enumerate all the current running services with their service types in the farm, use the enumservices operation
You can know more from the link here http://technet.microsoft.com/en-us/library/cc288605.aspx
Before running the provision service you will have to run stsadm –o enum services command to get the service type and name.
So copy every thing between and
Then run the command
stsadm -o provisionservice -action stop -servicetype Osearch
similarly for sp search.
Then run the following command psconfig -cmd services -install, and install the services.
Then run psconfig -cmd secureresources
Then start spsearch and osearch from command line
Stsadm –o spsearch –action start & stsadm –o osearch - action start
I bet the services will be started now
Search as we know is one of the best features on MOSS, Office SharePoint has the best ability to index and search documents, file share’s, and other things as well, it stores the indexed documents in search databases and renders them whenever required. Well that’s about how it works, but what will you do if your search service is central admin is shows the status as stopping or starting,
If your search service is stuck even after you reboot the server this might be a problem,
Look at the services console first and check if Windows SharePoint Search service is running and if the Office SharePoint servers search is running as well
Then check if they are running with the right service accounts.
This problem may arise the most when you have the two different accounts configured to run WSS and MOSS
What should I do?
Now you are at a stage where your search service is stuck it’s neither started not stopped. So when nothing works in SharePoint the command line works, let’s get our hero to work. J
First of all let’s get the search service stopped first. We will stop the OSearch first and then the WSS search.
To stop the search server you will have to use the command line operation here is the command
Stsadm –o osearch –action stop
Run iisreset / noforce
Similarly you will have to stop the wss search service
Stsadm –o spsearch –action stop
This will force stop the services, then we will un-provision the services before we actually start them, now if you are wondering what is provision service command used for it actually Starts or stops the SPService on the local computer or a custom service. To enumerate all the current running services with their service types in the farm, use the enumservices operation
You can know more from the link here http://technet.microsoft.com/en-us/library/cc288605.aspx
Before running the provision service you will have to run stsadm –o enum services command to get the service type and name.
So copy every thing between
Then run the command
stsadm -o provisionservice -action stop -servicetype Osearch
similarly for sp search.
Then run the following command psconfig -cmd services -install, and install the services.
Then run psconfig -cmd secureresources
Then start spsearch and osearch from command line
Stsadm –o spsearch –action start & stsadm –o osearch - action start
I bet the services will be started now
Enable Verbose logging in WSS3.0/MOSS 2007?
How to enable Verbose logging in WSS3.0/MOSS 2007? Go to Central Admin> Operations>Logging and Reporting>Click on Diagnostic Logging
Say we are facing issue Search is not returning any documents
(Different issues require different categories)
Select a category "Timer"
Least critical event to report to the event log "Verbose"
Click OK
Repeat same for Select a category "Timer Job"
Least critical event to report to the event log "Verbose"
Click OK
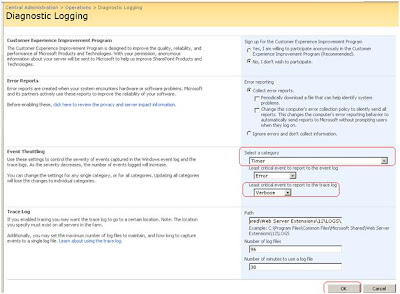
Reproduce the issue For example: Search for document in Shared Documents on SharePoint site.
Log file will be stored in C:\Program Files\Common Files\Microsoft Shared\web server extensions\12\ Logs folder by default.
Note:
Stop verbose logging once the logs are collected else it will take very large disk space over time. Log file will contain more details than normal ULS logs, now all you need to know is what to look for?
Monday, October 13, 2008
Prevent Content Deletion on SharePoint Sites
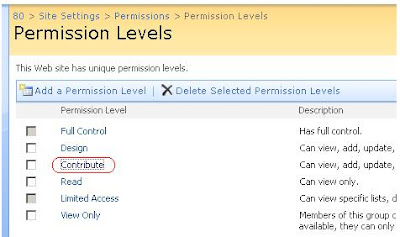
Log in as Service account litware\spadmin Go to Top level site>Site settings>Advanced permissions>Settings>Permission Levels
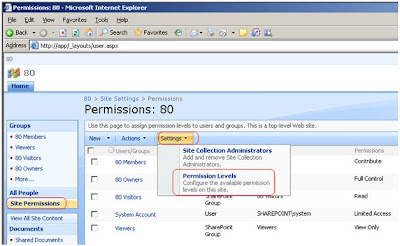
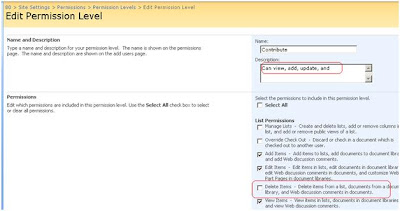
Click on Contribute
Uncheck checkbox Delete Items & remove "delete" word from description
Scroll down and click on submit Go to Site settings>People and Groups>New>Add Users
Add litware\user1 with Contribute permission
Sign in as different user
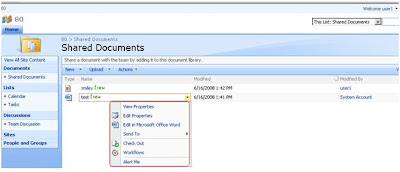
Sign in as litware\user1 Go to Shared Documents and created a word document "test" Delete option is not present in drop down We upload an image to Shared Documents Delete option is not present in drop down
Log in as service account litware\spadmin again Delete option is present in drop down list


Click on Contribute

Uncheck checkbox Delete Items & remove "delete" word from description

Scroll down and click on submit Go to Site settings>People and Groups>New>Add Users
Add litware\user1 with Contribute permission
Sign in as different user
Sign in as litware\user1 Go to Shared Documents and created a word document "test" Delete option is not present in drop down We upload an image to Shared Documents Delete option is not present in drop down

Log in as service account litware\spadmin again Delete option is present in drop down list

Note: For new users the permission will be effective after adding them to the site but the existing users need to be removed and added to site again. Same procedure can be repeated for other Users/Groups
Fantastic 40 Application Templates WSS3.0 / MOSS
1>Download templates from following links
Windows SharePoint Services 3.0 Application Template: Application Template Core
http://www.microsoft.com/downloads/details.aspx?familyid=C1039E13-94DA-4D7D-8CAE-3B96FA5A4045&displaylang=en
Windows SharePoint Services 3.0 Application Templates: All Server Admin Templates
http://www.microsoft.com/downloads/details.aspx?familyid=AAE4CB5A-91D2-4F1B-9A45-3BB894E218F8&displaylang=en
Windows SharePoint Services 3.0 Application Templates: All Templates
http://www.microsoft.com/downloads/details.aspx?familyid=5807B5EF-57A1-47CB-8666-78C1363F127D&displaylang=en
2>Extract ApplicationTemplateCore.wsp to C:\ drive
3>Open command prompt browse to C:\Program Files\Common Files\Microsoft Shared\Web server extensions\12\bin>
4>Run following commands
stsadm -o addsolution -filename C:\ApplicationTemplateCore.wsp
Expected output: Operation completed successfully.

stsadm -o deploysolution -name ApplicationTemplateCore.wsp -allowgacdeployment -immediate

(Additional attributes may be required based on your Windows SharePoint Services configuration. For example:Single Server: [ -local -time
6>Similarly we can deploy other application templates for example we deployed ITTeamWorkspace template
stsadm -o addsolution -filename C:\ITTeamworkspace.wsp

stsadm -o addsolution -filename C:\ITTeamworkspace.wsp

stsadm -o deploysolution -name ITTeamworkspace.wsp -allowgacdeployment -immediate
 7> All deployed templates can be found at Central admin>Operations>Solutions Management
 8> To use a template in SharePoint Site
1. Log into your SharePoint site as the site Administrator.
2. From the Site Actions drop-down menu in the top right, select Site Settings.
3. Under the Site Administration section, select Sites and Workspaces.
 4. Select Create to create a new site using a site template.
 5. Complete the new SharePoint site information. In the Template Selection section, select the Application Templates tab.
All deployed Application Template will be listed in this tab.
 6. Select the template to use for this site and click Create.
7. A site has now been created using the application template.
 8> To remove an Application Template solution:
Note: To complete the following installation, you must have Administrator rights to both the Windows SharePoint Services site and server on which it is to be installed.
1. As Administrator, access the server. Removal is done via the command line utility stsadm.
2. To retract a solution from being available to SharePoint sites, run "stsadm –o retractsolution –name.wsp".
Additional attributes may be required based on your Windows SharePoint Services configuration.
 9>Central admin>Operations>Solutions Management status of template changes to "Not Deployed"
 Note: sites created from a solution will not function after the solution has been retracted.
Sites based on the template will give following error
404 NOT FOUND
 10> If we try to redeploy the template with same command we get following error
After adding -force parameter the template is deployed successfully

Central admin>Operations>Solutions Management>Template status is still Not Deployed
 11> IIS Reset & redeploying template did not help.
12> Copied ITTeamworkspace.wsp to G:\ drive & redeployed template still status is Not Deployed.
13> Rebooted the server still status is Not Deployed.
14>Redeployed the template this time it worked & status changed to Deployed.
15> The site based on the template also loaded successfully.

 7> All deployed templates can be found at Central admin>Operations>Solutions Management
 8> To use a template in SharePoint Site
1. Log into your SharePoint site as the site Administrator.
2. From the Site Actions drop-down menu in the top right, select Site Settings.
3. Under the Site Administration section, select Sites and Workspaces.
 4. Select Create to create a new site using a site template.
 5. Complete the new SharePoint site information. In the Template Selection section, select the Application Templates tab.
All deployed Application Template will be listed in this tab.
 6. Select the template to use for this site and click Create.
7. A site has now been created using the application template.
 8> To remove an Application Template solution:
Note: To complete the following installation, you must have Administrator rights to both the Windows SharePoint Services site and server on which it is to be installed.
1. As Administrator, access the server. Removal is done via the command line utility stsadm.
2. To retract a solution from being available to SharePoint sites, run "stsadm –o retractsolution –name
Additional attributes may be required based on your Windows SharePoint Services configuration.
 9>Central admin>Operations>Solutions Management status of template changes to "Not Deployed"
 Note: sites created from a solution will not function after the solution has been retracted.
Sites based on the template will give following error
404 NOT FOUND
 10> If we try to redeploy the template with same command we get following error
After adding -force parameter the template is deployed successfully

Central admin>Operations>Solutions Management>Template status is still Not Deployed
 11> IIS Reset & redeploying template did not help.
12> Copied ITTeamworkspace.wsp to G:\ drive & redeployed template still status is Not Deployed.
13> Rebooted the server still status is Not Deployed.
14>Redeployed the template this time it worked & status changed to Deployed.
15> The site based on the template also loaded successfully.

Migrate SharePoint Portal Server 2003 site to a new Server?
On Production SPS2003 Server:
Open Central Administration page
Click on SharePoint Portal Server
Click on Configure Virtual Server settings from the Virtual Server List Page
Click on Production virtual Server name
Click on Manage content database
Note down the database name
On Production SQL Server Enterprise Manager/Management Studio Backup _PROF _SERV & _SITE Database
On Test Server:
On a test box Install same SQL Server version as Production (SQL 2000 + SP4)
Restore _PROF _SERV & _SITE databases from backup files taken from Production SQL server Add Domain\ServiceAccount and Right Click> Properties>Server Roles Tab assign minimum DBCREATOR & SECURITY ADMIN
In Database Access make Domain\ServiceAccount dbo for SharePoint databases
Install SPS2003 on test box (Make sure SharePoint version is same as Production box i.e. same Service packs, hot fixes etc)
Select Install without database engine for SQL Server
Provide Domain\ServiceAccount & password
When Central admin page opens
in Default Content Access Account Check Specify account checkbox & enter Domain\ServiceAccount & password Type same for Portal Site Application pool Identity & Click Ok
Select Radio button Create configuration database
Enter database server as Test Server itself
Make sure Configuration database name is not already present in SQL Server & Click OK
Enter email address Select radio button Do not connect by using a proxy server (Default) & Click OK
On Configure Server Topology page Click Change component button
Select Web Search Index role check boxes for Test Server & select Job Server drop down list name as Test server & Click OK
On Next page click Close button at bottom right
In IIS Manager create a new Application Pool Test_App_Pool
Right Click>Properties>Identity Tab Select radio button Configurable
Enter Domain\Service Account & password click OK
Retype password and click OK
In IIS Manager Create a new Website "Test"
Select unused port [say 90] Click Next
Enter home directory path Uncheck Allow anonymous access checkbox click next
Select Read, Run & Execute permission checkboxes & click Next
Click Finish
Right Click Test web site>Properties>Home Directory Tab Select Application pool as Test_App_Pool & Click OK
Close IISManager & Open a Run Prompt Type IISRESET & Click OK
Start>Administrative Tools>SharePoint Central admin page
Click on SharePoint Portal Server
Create a portal site
Select radio button Restore a portal
Provide _SITE _PROF & _SERV database names which are restored on Test SQL Server Select virtual server "Test" from drop down list & Click OK
On next screen Click Ok Wait for portal to be restored
If we get Operation Successful message the portal is restored succesfully
Subscribe to:
Posts (Atom)